Search This Blog

Tuesday 28 March 2017

Business Intelligence, is not showing Visual Studio 2013 in new Project

Scenario: If Business Intelligence (BIDS)is not showing in Visual Studio 2013 in New Project.


You already installed SQL Server 2014 and MS Visual Studio 2013 but still Business Intelligence (BIDS) is not showing.
Solution: You required Microsoft SQL Server Data Tools - Business Intelligence for Visual Studio 2013. I have provided the link, please download the Setup.

  • After download the setup and now extract it.
  • Run the setup and click on “New SQL Server stand-alone installation or add features to an existing installation”.
  • Click on “I accept the license terms” and click on Next Button.
  • Click on check box Use Microsoft Update to check for updates(recommended)” and click on Next button.
  • Tick mark on Perform a new installation of SQL Server2014 and click on Next button.
  • Click on Select All and click on Next button.
  • Wait for few minute because installation is in progress mode.
  • Installation is complete and now restart the system.
  • You will check again in MS Visual Studio 2013 has been added Business Intelligence (BIDS) in New Project.

Microsoft Dynaimcs AX AIF60 has invalid share address

Scenario: You have installed Microsoft Dynamics AX Web Service on IIS and open the Web Sites in Services and application intergation framwork, you can see the error “MicrosoftDynamicsAXAif60 has an invalid share address” while click on validate button in Web sites


Solution: Please going on same, click on Brows button.
Navigate to the folder as below:
C:\Program Files\Microsoft Dynamics AX\60\AifWebServices Click ok.
Click on Validate button.

Install Web Services on IIS for AX 2012 R3

AX2012 R3 Web Services on IIS (AIF) step by step installation and configuration with Screen shot.


Configure the Web Server (IIS) Roles.
  1. Click Server Manager.
  2. Click add Roles and features.
  3. Click Server selection.
  4. Click Server Roles.
  5. Expand Web server (IIS) (31 to 43 installed).
  6. Expand Web server (26 to 34 Installed).
  7. Expand Application Development (7 to 11 Installed).
  8. Verify ASP.NET is Installed.
  9. Click Close.
  10. Click Close.

Install Web Services on IIS.
  1. Click the Start icon.
  2. Click This PC.
  3. Open the Microsoft Dynamics AX Folder.
  4. Double click on the setup.exe.
  5. Under Install, Click Microsoft Dynamics AX Components.
  6. Click Next.
  7. Select I accept the license terms.
  8. Click Next.
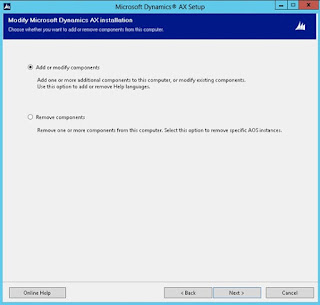
  9. Make sure that Add or modify components is selected.
  10. Click Next.
  11. Select Web service on IIS under the Integration components node.
  12. Click Next.
  13. When no errors remain, click Next.
  14. On the Specify Business Connector proxy account information page, “admin@123”.
  15. Click Next.
  16. Note.
  17. Click Next.
  18. On the specify an AOS account page, make sure that CONTOSO\Administrator is selected.
  19. Click Next.
  20. When no error remains, click Next.
  21. On the ready to install page, click Install.
  22. After the installation is complete, click Finish to next wizard.

Configure Security.
  1. Hover over the bottom of the page to show the Taskbar.
  2. Click the Start icon.
  3. Click This PC.
  4. Navigate to the following path C:\Programme files\Microsoft Dynamics AX\60.
  5. Right-click the AIFWebServices folder.
  6. Click Properties.
  7. Click the Sharing tab.
  8. Click Advanced Sharing…
  9. Click Permissions.
  10. Click ADD...
  11. Click the Enter the object name to select field.
  12. Type “Microsoft Dynamics AX Web Server Administrators”.
  13. Click OK.
  14. Make sure that all check boxes in the Allow column are selected.
  15. Click OK to return to the Advanced Sharing dialog.
  16. Click OK to return to the AifWebServices Properties dialog.
  17. Click the Security tab.
  18. Click Edit.
  19. Click Add...
  20. Click the Enter the Objects name to select field.
  21. Type “Administrator(Administrator\contos.com).
  22. Click OK.
  23. Select the Allow check box for Full Control.
  24. Make sure that the Allow check box for Modify, Read & Execute, List folder contents and Read are selected.
  25. Click OK to return to the AifWebServices Properties dialog.
  26. Click Close to exit the form.

Validate the Web Site.
  1. Hover over the bottom of the page to show the taskbar.
  2. Click the Start icon.
  3. Click the Search icon.
  4. Type IIS.
  5. Click Internet Information Services (IIS) Manager.
  6. In the connection pane, expand the AX2012R2A (CONTOSO\Administrator) node.
  7. Click the Application Pool.
  8. In the Application Pool pane, right-click the MicrosoftDynamicsAXAif60 application pool.
  9. Click Basic Settings...
  10. In the .NET CLR Version field, click the drop down list.
  11. Select .NET CLR Version v4.0.30319.
  12. In the Managed pipeline mode field, click the drop down list.
  13. Select Integrated.
  14. Notice that the Start application pool immediately option is selected.
  15. Click OK.
  16. Click Minimize.
  17. Open Microsoft Dynamics AX.
  18. In System Administration, under Setup, click Services and Application Integration Framework.
  19. Click Web Sites.
  20. Make sure that the AX2012R2A-DynmicsAXAIF-MicrosoftDynamicsAXAif60 web site that was created automatically by the setup wizard is selected.
  21. Click Validate.
  22. Note.
  23. Click Close.
  24. Click Close to close the Web sites form.
  25. The practice has been completed.

Installation (Screen Shot)

Please find the below steps to install and configure the AX2012R3 Web Service on IIS (Application Integration Framework).

Webserver role must be installed in a server to install the AX Web services on IIS.

Step1: - Run the AX2012R3 Installation media, click on Microsoft Dynamics AX Components.

Step2: - Please click on the Next button to progress the installation.

Step3: - Please click on the Add or modify components, then go with the next button.
Step4: - Select the Web Service on IIS Components, the go with the next button.
Step5: - Prerequisite validation will guide to configure the tool, Please click on configure and revalidate, then go with the next button

Step 6: - Please enter the Business connector user account password, then go with the next button.
Step 7: - Please select the Default website or Custom site from the dropdown.
Step 8: - Add the relevant users to get the permissions to get the AIF virtual directory access.
Step 9: - Please check for the prerequisite validation again before installing the components, then go with the next button.
Step 10: - Please verify the selected Web services on IIS components, then go with the install button.
Step 11: - Post installation configuration task will be performed.
Step 12: - Make sure the Web Service on IIS components is installed successfully.
Step 13: - To double check the Webservices installation, Please navigate to System administrationàSetupàServices and AIFàWebsitesàValidate and check the configuration.
Installation and configuration is complete.

Thanks for Rudra Kumar.

Wednesday 22 March 2017

Setup encountered an unhandled exception and could not be completed


Ax 2012 AOS Server Installation Problem

If you install AX 2012 AOS and getting the error as same:


The error described here can be caused having the wrong of “Microsoft Dynamics AX 2012 Setup support file” installed on the target system. This installation support package is installed automatically when running the installation wizard for AX2012, or any of its upgrade packs. So if you tried to install AX2012 CU5 first (or some other upgrade), then found that you needed to install the basic AX2012 Package before applying the upgrade…you will get this error during installation of the basic AX2012 package because the “setup support file” package already present on the target machine (installed during your abortive attempt to install CU5 directly) is another version then the expected by the basic installation package.

Solution: Look for the entry name “Microsoft Dynamics AX2012 Setup Support file” in the control panel’s list of installed programs. If found, uninstall it – then try your AX installation. (The correct setup support file” package will then be installed as part of AX 2012 installation process).


Setup is Unable to proceed due to the following error in Share Point 2013

Issue:

While installing share Point 2013 SP1on windows server 2012 r2, the installation error out if windows update has been prior installation of SP. Following is the error seen in the below clipping.

Error:

Setup is Unable to proceed due to the following error in share point 2013. This product requires Microsoft .Net Framework 4.5 .


Scenario:
  1. Share point 2013 SP1 pre-requisites installed successfully along with MS Recommended windows.
  2. Windows update essential updated .Net Framework to version 4.6. this causes a false alert for share point 2013 installer that pre-requisites .Net Framework 4.5 is required

Solution:
  1. Go to control panel.
  2. Program and Features.
  3. click on View installed updates.


 4.     Going on search option.
5.     Type KB3102467.


6.     Right click on the KB and click on Uninstall and confirm Yes.


7.     After restarting server, run share point 2013 setup.                                                                                          

Failed to log on to Microsoft Dynamics AX


Failed to log on to Microsoft Dynamics AX

When you have just installed AX or got a backup of the AX database from someone, you may not be able to “log on to Microsoft Dynamics AX 2012”.


A following error massage may be displayed.


The issue is that you have not been configured as a user in the AX database.

Solutions: The solution following some steps:

1.     Extract you SID as follow:
To get for the current logged in domain user, please type the following in your command promptà C:\>whoami /user

To get SID for all domain users, please type the following in your command promptàwmic useraccount get name,sid


2.     Copy the SID into your AX database in SQL Management Studio.
Also change the Network Domain and Network alias as per your credential and follow the steps:
·        First open your SQL Server Management Studio.
·        Expand the database.
·        Choose your current database and expand.
·        Go to table and expand.
·        Right click on “dbo.userinfo” file and  click on “edit top 200 Rows”
·        Replace SID and Network Domain


Its working let’s enjoy….


Tuesday 14 March 2017

If you Installed on Contoso.com SQL Server and later changed the name of the domain to access the server are having difficulty due to which gross Today, we will tell you some facts on what causes your overall server will complete!

You got the error as below while open MS SQL Server:


Open SQL in SQL Server authentication Mode.

Enter the login and password is correct and click on connect.


After Login Expand the security and right on logins and click on New login…


Click on search button and go to advanced click on find Now and choose Administrator (it.com/users).
Click OK again click OK.


Click on server roles and tick mark on all Roles.


Click on User Mapping and tick mark on as below and click OK.


You can Disconnect SQL Server and Reconnect Windows authentication.