Microsoft
Web Application Proxy [WAP] is a new
service added in Windows Server 2012 R2 that allows you to access web
applications from outside your network. WAP functions as a reverse
proxy and an Active Directory Federation Services [AD FS] proxy to
pre-authenticate user access.

Requirements:


vBoring Blog
Series:
- How to setup Microsoft Active Directory Federation Services [AD FS]
- How to setup Microsoft Web Application Proxy
Requirements:
- The only hard requirement of WAP is having an AD FS server. Refer to step 1 for setting that up.
- WAP cannot be installed on a server that AD FS is installed on. They must be separate servers.
Installing the Web Application Proxy Server Role:
Open Server Manager and click Manage -> Add
Roles and Features.
Click Next:

Role-based or feature-based installation should be selected
then click Next:

Select the server you want to install this role on to
and then click Next:
Note: Web Application Proxy
role and AD FS cannot be installed on the same computer.

Select Remote Access then click Next:

No additional Features are needed. Click Next:

Click Next:

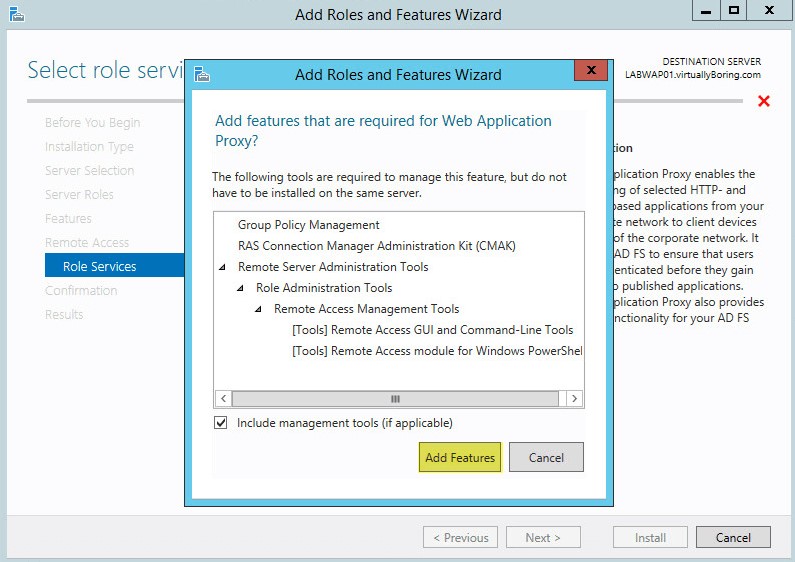
Select Web Application Proxy:

On the pop up click Add
Features:
The Web Application Proxy role does not require
a reboot. Click Install:

Once complete click Close:

Web Application Proxy is now installed but you
need the AD FS certificate to continue.
Export & Import the AD FS Certificate:
You need the certificate from your AD FS server
added to your Web Application Proxy server. Login to your AD FS server and open MMC.exe:
Go to File -> Add/Remove
Snap-ins ->
select Certificates then click Add:

When you click OK you will get the following pop up.
Select Computer account then click Next:

On AD FS Server: Drill down to Personal -> Certificates then right click the SSL certificate you used during
setup of AD FS. Go to All Tasks -> Export.
Save to a location that your Web Application Proxy can access. Ensure you
export the Private Key and certificate as a .PFX file.

On Web Application Proxy: Right click on Personal -> Certificates then go to All
Tasks -> Import:

This will bring up the Certificate Import
Wizard. Click Next:

Browse to the certificate that you exported from
your AD FS server and select it. Click Next:

Enter the password for the private key and check
the box to make the key exportable. Click Next:

Leave the default certificate store as Personal.
Click Next:

Click Finish:

You should now see the certificate from your AD FS
servers on your Web Application Proxy server.

Now we are ready to perform the Post
Configuration.
Post-Deployment Configuration:
Back on your Web Application Server open Server Manager then click Notifications then
the message Open the Web Application Proxy Wizard:
Click Next:

Enter the FQDN of your AD FS name and the Service Account you created
during AD FS setup. Click Next:

On the drop down menu select the certificate you
imported from your AD FS server. Click Next:

Click Configure:

Once finished click Close:

Remote Access Management Console should open when you clicked Close. On Operations Status you should see all the objects as green.

Publish Web Applications:
Now we are finally ready for the magic. In the Remote
Access Management Console click Web
Application Proxy then Publish:

Click Next:

Pass-through will let WAP act like
a reverse proxy. I will have documentation on setting up AD FS link soon!
Select Pass-through and click Next:

Name: Enter a display
name
External URL:
Enter the URL that will be coming in your the WAP server externally
External Certificate: The drop down menu will show certificates that are added on the WAP
server. Select the same certificate that you used while setting up your
application. In my case I used my wildcard certificate
Backend server URL: Enter the web URL of the server you want the external URL forwarded
Click Next:

Copy the PowerShell command down and with
some minor edits you can easily add additional Pass-through applications with
ease.
Click Publish:

Click Close to finish:

You will now see the published web application
and ready for testing.

You are ready to test the application!
Configure Firewall for 443 Port Forwarding:
Before you can test you need to ensure you have
port 443 (HTTPS) being sent to your WAP server. This step does not involve
configuration of your WAP environment but on your firewall. Since this can vary
greatly I will give you two examples of this step:
For pfSense you would create a NAT: Port Forward Rule:

For DD-WRT you would go to NAT / QOS then Port Forwarding:

Once added you are ready to test !
From outside your network (like
on your phone or a PC elsewhere) try
to access your web link. You should get your internal web page through your WAP
externally! Success !

Coming Soon!! Setting up Microsoft RDS to
use AD FS authentication through WAP !
No comments:
Post a Comment